|
 |
This install takes 45 minutes to an hour and requires a little bit of patience. There are really 3 individual installs wrapped into one: Ultrasonic Sensor (interior), Tilt Sensor (trunk), Siren (under the hood). As a word of advice always work from clean to dirty - Install the interior sensor then the trunk sensor then the siren under the hood.
After you install everything it will not work! (just thought I'd throw that in :-) - You will need to go to a dealer and have them activate the system - typical fee for this is 1/2 hour labor, anything more than that is a rip off.
Click on the images for larger views. |
Step 1: Getting the required items together
This install requires:
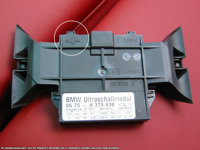
- 1 OE Alarm Kit (Ultrasonic Sensor, Tilt Sensor, Siren, bracket, bolts)
- #30 Torx Driver
- 10mm socket and socket wrench
- A BMW M3 (E46).
- 45 minutes to an hour of free time.
|
 |
|
Step 2: Start Inside the Car
- Make sure your hands are clean.
- Locate the raised cover in the center of the roof.
- Use your finger nails or a small screwdriver to pry the back edge of the cover and pop it out.
|

Center Cover |
Step 3: Popping in the Sensor
- Note that the ultrasonic sensor has a directional arrow molded into the bottom of its body.
- Note that the cover you popped off the roof also has a directional arrow molded on the inside.
- Place the sensor into the cover with the arrows pointing in the same direction (it will snap in).
|
Sensor
Sensor in Cover |
Step 4: Connecting the Sensor
- If you look at the receptacle for the cover with the sensor in the roof you will see a wiring harness neatly attached out of the way.
- Pull the plug out of its receptacle in the roof and plug it into the sensor - it will snap in when seated.
- Pop the cover with the sensor installed and connected back into the roof - it just snaps in.
- You're done inside!
|

Harness

Harness Plugged Into Sensor |
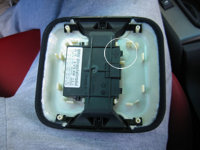
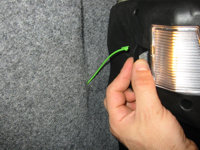
Step 5: On to the Trunk!
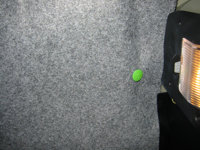
- Note the bright green "plug" just to the side of the tail light assembly on the passenger's side of the trunk (the gas cover release).
- Gently pull the green plastic plug out about 6" or enough that you can work on it.
- Note that the stem of the plug is split - pry the stem apart at the split with your finger nail or a small screwdriver.
|
Gas Plug
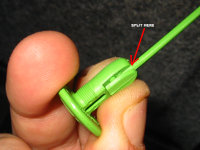
Taking it Apart |
Step 6: Pop Out the Tail Light Cover
- There is a gray lever on the back of the tail light assembly - squeeze it toward the black tab beside it and the assembly will pop out (this is true for both LED and old style lights. If you have a pre-LED car and want more details on how to pop the old style light out see the DIY I have for rear brake lights).
|
Popping the Tail Light Backing |
Step 7: Opening Things Up
- There is one more thing to loosen before you can pull back the gray cover from the wheel well.
- Note the black plastic "screw" pretty much directly above the wheel. Turn it 1/4 turn and it will release.
- Now you can gently pull back the gray cover to expose the mounting location for the tilt sensor.
- Start by pulling the cover from the tail light forward. It does not have to come out the whole way, just to the back of the wheel.
|
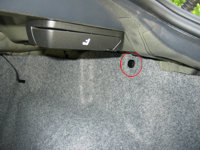
Releasing the Cover
|
Step 8: Mounting the Tilt Sensor
- The first image give you a visual brake down of what goes where.
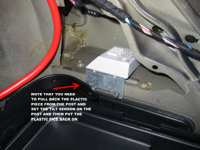
- Pull back the plastic piece off the front sensor mounting post.
- Mount the tilt sensor by sliding it onto the posts, placing the plastic piece you pulled off on top of the front post and then securing everything with the two bolts.
- From the first picture on this step note the location where the harness for the tilt sensor is. Its wrapped together with other wiring as show in the image. Unwrap the cloth tape and free the wiring harness.
- Plug the harness into the tilt sensor.
|
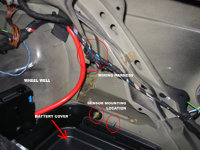
Under the Cover
Tilt Sensor In Place
Tilt Sensor Wired Up |
Step 9: Covering Things Up
- With everything wired up, you need to cover things back up.
- Start from the wheel back, gently pop the cover back into place.
- When you get close to the tail light make sure to pop the green cable for the gas cover release back through its hole in the trunk liner.
- Once the liner is seated, turn the plastic plug back in (above the wheel well).
- Pop the tail light cover back in.
- Reassemble the gas cover release plug by pressing the cable back into the top section and push the cable and plug back in the liner.
- You're done in the trunk.
|
|
Step 10: Under the Hood
- The cover over the HVAC air filter is the first to come out.
- Note the 3 plastic "bolts" each needs to be turned about 1/4 turn in order to release. These are spring loaded and they will pop up as they release.
- Once the three bolts are released simply pull the cover out.
- Once the cover is out remove the air filter.
|
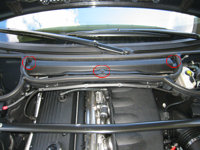
Retaining "Bolts"

Retaining "Bolt" Close-Up
HVAC Filter Exposed |
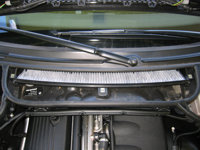
Step 11: Releasing the Wiring Loom
- There is a wiring loom at the front the plastic tray that held the HVAC filter.
- This needs to come apart by pulling off the front plastic cover.
- There are 4 clips along its length, you can pop each off with your fingers.
- Once the front cover is off, gently pull the wiring and hose out of the attached section.
|
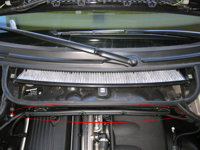
Wiring "Loom"

Popping the Front Off
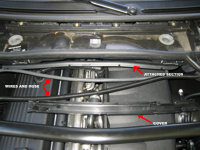
Cover Off |
Step 12: Removing the Filter Tray
- There are 4 #30 Torx bolts holding the filter tray in place (see image).
- Loosen all 4 - they will not pull out of the tray itself, just make sure there are loose from the car.
- Gently lift the tray out of the car.
|
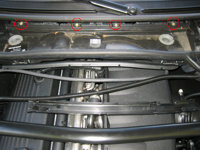
Bolts on Filter Tray |
Step 13: One Last Thing To Take Out!
- There is a final cover before you get to the firewall. It is attached with 2 #30 Torx screws and 1 plastic retainer (see image)
- Loosen the Torx screws and remove the plastic retainer (careful with this - it will pop out of the cover - I had to climb under my car to dig it out after it fell).
- Gently lift the cover out of the car.
|
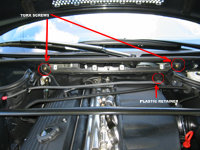
Bolts on Cover
Bolts on Cover Close Up |
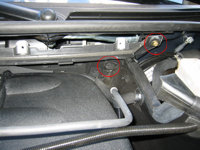
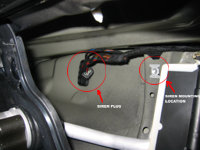
Step 14: Locate and Free the Siren Harness
- If you look into the passenger side of the opening you have created by removing the cover you will a wiring harness taped up out of the way (see image).
- Unwrap the tape to free the plug and wiring for the siren.
|
Harness |
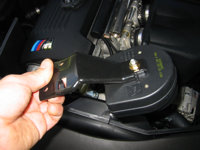
Step 15: Assembling the Siren
- Attach the bracket onto the back of the siren - there is only one way it can go - tighten the nut.
|
Siren on Bracket |
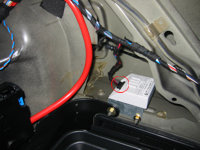
Step 16: Installing the Siren
- Note the mounting location on the firewall (see image in Step 14).
- The bracket attaches with a single bolt and the siren side of the assembly should point toward the outside of the car.
- There are a couple of centering tabs on the bracket - when correctly installed these will act to keep the bracket in place.
- Plug in the wiring harness into the siren.
|

Siren Installed |
Step 17: Putting Everything Back Together
- Replace the pieces you removed to get to the firewall in reverse order.
- There are a number of rubber gaskets and grommets that buttress up against the various pieces your are putting back in.
- Make sure that the rubber pieces are properly positioned (look at the images in the steps above to make sure).
|
|
Step 18: Activating the Alarm
- Everything is installed but it does not work - that's correct.
- Can't DIY this step - you will need to go to the dealer to have the alarm activated.
- This should take 1/2 hour or less - any dealer that wants more is ripping you off.
|
|

|