|
 |
This job takes about 20 to 30 minutes of actual work. This is pretty easy but requires attention. If you are not comfortable or competent with working on your brakes, leave it to a professional!
The method below requires a helper. If you are going to go to the trouble of doing this make sure to recruit a buddy or spouse to help. Helper can be completely clueless but has to be able to follow directions (like pedal down and release pedal).
DO NOT GET BRAKE FLUID ANYWHERE NEAR PAINTED SURFACES - This stuff will take paint off at least as well as paint thinner!
Click on the images for larger views. |
WARNING:
- The information provided at "M3.MADRUSSIAN.NET" web site is "as is" with all faults and without warranty of any kind, expressed or implied, including those of merchantability and fitness for a particular purpose, or arising from a course of dealing, usage or trade practice. "M3.MADRUSSIAN.NET" web site nor it's owner/creator, can not and does not provide any warranty, expressed or implied, about the accuracy or use of information found on "M3.MADRUSSIAN.NET" web site. The user assumes that risk.
- Under no circumstance will "M3.MADRUSSIAN.NET" web site nor it's owner/creator, be liable to any person or business entity for any direct, indirect, special, incidental, consequential, or other damages based on any use of this web site or any information contained herein, including, without limitation, any lost profits, business interruption, or loss of programs or information.
- THE USE OF THIS DIY IS FOR YOUR REFERENCE ONLY. M3.MADRUSSIAN.NET AND ITS OWNER/CREATOR DISCLAIM ALL LIABILITY FOR DIRECT, INDIRECT, INCIDENTAL, OR CONSEQUENTIAL DAMAGES OR INJURIES THAT RESULT FROM ANY USE OF THE EXAMPLES, INSTRUCTIONS OR OTHER INFORMATION IN THIS DIY.
|
Note:
- You will need to remove the wheels (you can do so one at a time) to bleed the brakes. To bleed the clutch you will need to get under the car and remove the plastic shields under the transmission - probably best to just get the car up on a lift or jack stands. See Getting car up on jack stands DIY.
|
Step 1: Getting the required items together
This job requires:
- Pressure Bleeder (I used one made by Motive - the steps assume that this is what you are using).
- Brake Fluid (I used ATE Super Blue Racing)
If you are planning on replacing all of the fluid in the system you will want to get 1.5 to 2 liters of fluid - The system's capacity is right around 1 liter but I would not risk it.
- Can or Jar to catch old fluid
- Turkey Baster (no, I'm not kidding)
- A lift or some other method of getting the wheels off the ground.
- 9mm Open Wrench
- 6mm Open Wrench
- 8mm socket
- Socket wrench
- Rubber Mallet or Dead-Blow Hammer
- Helper
- A BMW M3 (E46).
- About 20 - 30 minutes of free time.
|
 |
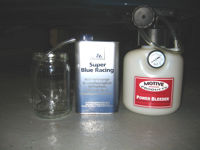
Motive, ATE & Jar |
Step 2: Start by removing some of the old brake fluid from the reservoir
- Locate the brake fluid reservoir on the driver's side of the car, up toward the firewall.
- Remove cap and pop out the screen filter in the top of the reservoir.
- Using the turkey baster siphon out as much of the old fluid as you can - place what ever your using to drain the fluid into as close as you can to the reservoir so that you do not have to carry the baster with fluid over any painted surfaces (fender, etc).
- Once you get as much fluid out as you can, replace the screen filter and refill the reservoir with new fluid up to max level.
|

Brake Fluid Reservoir Location |
Step 3: Working with the pressure bleeder
- Test the bleeder and connection first by connecting an empty bleeder to the car's fluid reservoir and pressurizing the bleeder to about 20 psi (don't go any higher or you might blow the cap off the reservoir making a bloody mess) and check for leaks - if all is well - continue. If you find leaks take a look at the rubber seal inside the end cap of the bleeder (the part that screws on the reservoir). If you cannot fix the leak - DO NOT use the pressure bleeder as you will spray fluid all over the car and cost yourself a very expensive repaint job. If everything checks out continue.
- Fill the pressure bleeder with about 1 liter of new brake fluid (I'm assuming a Motive bleeder - always follow manufacturer's instructions).
- If you are planning on replacing the fluid in the system rather than just bleeding put about 1.5 to 2 liters in the pressure bleeder - the LAST thing you want is to run out of fluid and pump air into the brake system.
- Screw the cap back on the bleeder and connect the bleeder up to the car's brake fluid reservoir.
- Pressurize the bleeder to around 20 psi (no higher!) - you'll see fluid being pushing toward the reservoir through the hose as you do this.
|
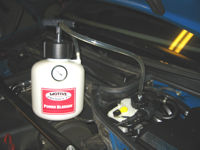
Testing the Pressure Bleeder
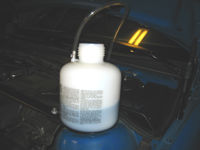
Filling the Pressure Bleeder |
Step 4: Start at the Passenger Rear wheel
- Though the front and rear systems in an M3 are more or less independent old habits die hard and its always a good idea to use the following pattern to bleed the brakes: Passenger Rear, Driver Rear, Passenger Front, Driver Front. The idea is to bleed the calipers from furthest away from the reservoir to the closest.
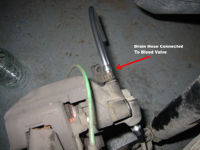
- The bleed valve is located toward the top of the rear caliper and is covered by a little rubber cap.
- Pop the cap off and slide the hose you got with your bleeder onto the end of the valve - make sure its well seated.
- Position your drain jar, etc under the end of the hose.
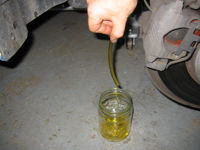
- Take your 9mm open wrench and open the bleed valve by turning it counter clockwise about 1/2 to 3/4 of a turn - the fluid will start to flow out of the caliper.
- If there is air in the system you will see small bubbles flowing out of the caliper.
- Let the fluid drain till you no longer see air bubbles and then close the valve back up.
- If you are replacing the fluid in the system it is wise to use a fluid of a different color so that you can see when the old fluid is out of a given caliper and new fluid is flowing out.
- MAKE SURE YOUR BLEEDER DOES NOT RUN DRY and that pressure stays up above about 15 psi - you may have to close the bleed valve and add pressure or fluid to the pressure bleeder during the procedure, that's OK. This is where a helper is useful as the he/she can watch the pressure and fluid level in the bleeder.
- Once you're done with the passenger side caliper, move onto the driver's side rear caliper, then on to the front passenger side and finish at the driver's front.
- The process for front calipers is identical to that for the rear and bleed valve location is pretty much the same.
|
Rubber Bleed Valve Cap (from rear of caliper)
Valve Exposed (from rear of caliper)
Drain Hose Attached To Valve (from above caliper)
Draining Fluid |
Step 5: Getting at the Clutch Bleed Valve
- Since the clutch uses the same fluid as the brakes its typically a good idea to bleed any air out of there as well.
- This is actually the most involved part of the bleeding process.
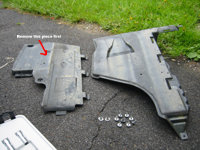
- You need to remove 2 of the plastic shields under the transmission to gain access to the clutch bleed valve.
- Work from the driver's side of the car and remove the two shields pictured here -->
- The shields are have a series of 8mm screws and bolts as well as being interlocked with tabs.
- Remove the smaller shield that is closest to the side of the car first.
- Make a mental note at to how these are installed - this will make reinstalling them MUCH easier.
|
View From Under the Car
Shields Removed |
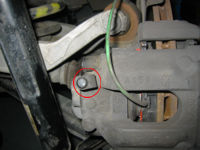
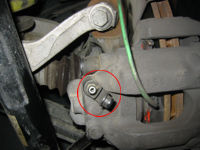
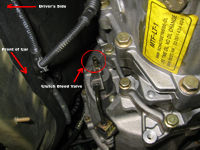
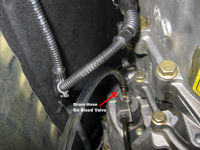
Step 6: Bleeding the Clutch
- Locate the clutch bleed valve on the driver's side rear of the transmission case (see image).
- Slip your drain hose onto the valve and open (6mm open wrench) and bleed the valve the same way as you bled the brakes.
- Once you're satisfied close the valve and reinstall the plastic shields.
|
Clutch Bleed Valve
Drain Hose on Valve |
Step 7: Disconnecting the Pressure Bleeder
- Tilt the bleeder so that the pick up line inside the bleeder is not immersed in fluid.
- Slowly unscrew the top of the bleeder itself (not the connection to the reservoir!).
- The fluid still in the tube connecting it to the reservoir will flow back inside the bleeder.
- Once the bleeder is de-pressurized you can remove the connection from the car's reservoir.
- Again be careful not to spill any fluid on anything painted!
- You're now done with the bleeder. Set it aside and remember to clean it out before storing it.
|
|
Step 8: Grab Your Helper
- This is where you really need your helper.
- Make sure your brake fluid reservoir is full.
- Go back to your rear passenger side caliper and reattach the drain hose to the bleed valve.
- Have your helper press the brake pedal 5 times to the floor to pressurize the system.
- Take your rubber mallet or dead-blow hammer and tap the caliper to loosen any bubbles stuck in the system (don't beat the hell out of it - a few good taps should do it)
|
|
Step 9: Finishing Touch
- Have the helper press the brake pedal down to the floor again and hold it there.
- Open the bleed valve. Make sure your helper does NOT release the pedal as that will suck air back into the system!
- The system will lose pressure and the pedal will go all the way to the floor.
- Once fluid stops flowing close the valve and then tell the helper to release the pedal.
- Repeat this step at least 3 times - or till no more bubbles are seen.
- Make sure that your brake fluid level does not drop below minimum in the reservoir or you will suck air into the system - add fluid as required to keep it topped off.
- Repeat for the rest of the brake calipers (including Step 8 above for each).
- Once you have done this for all of the calipers your pedal should be VERY firm - this is the goal - if its mushy you still have air in the system - repeat the process or have a professional do it for you.
- Replace the rubber caps on the bleed valves and make sure the valves are snugged down.
- Make sure your fluid level is good and close the reservoir.
- You're done!
|
|

|