|
 |
This job takes 20 - 30 minutes of actual work. This is really the easiest suspension work you'll ever do.
Click on the images for larger views. |
Note:
- Your front wheels must be off the ground to effect this change. You cannot do this on ramps - the wheels must hang "free" to do this.
- If you have an aftermarket strut bar (this is not an issue with OEM strut bars) you may not be able to reinstall it after you move the struts. Check your aftermarket strut bar to see if the brackets are slotted to allow adjustment or if there is some sort of adjustment available to make it about half an inch shorter.
- You can get even more camber from stock parts (though probably way too much for street use) by either turning the strut bearings or by swaping them side to side. There is a good article and DIY on this at http://e46m3performance.com/installs/strut-top/.
|
Step 1: Getting the required items together
This job requires:
- A lift or some other method of getting the front wheels off the ground.
- Floor Jack
- 13mm socket
- Torque wrench (recommended)
- 4mm Allen key (apparently some cars have a star (torx) bolt rather than the 4mm Allen bolt)
- A BMW M3 (E46).
- 20 - 30 minutes of free time.
|
 |
|
Step 2: Strut Bar or No Strut Bar - That is the Question:
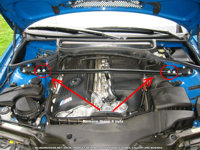
- To remove your OEM strut bar - start by removing the center section (the traverse)
- If you are confused on how the OEM strut bar is installed see the DIY install here.
- Loosen and remove the two nuts at the ends of the traverse and remove the traverse itself.
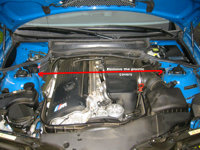
- If you do not have a factory strut bar, your car will have a set of plastic covers over the strut tower tops - remove these (they just pop off) (see image).
- DO NOT LOOSEN OR REMOVE THE BRACKETS OR STRUT NUTS AT THIS TIME!
|
Cars with OEM Strut Bars
Casrs without OEM Strut Bars |
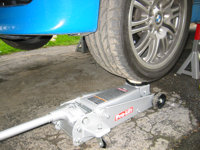
Step 3: Supporting the Sturt
- Lets start on the driver's side (easier since the battery terminal does not get in the way).
- Since you will be removing the nuts that hold the strut in place you will need to support it (actually the wheel) so that it does not fall out of the slots in the strut towers or most of the way out of the car causing a serious headache.
- Use a floor jack to support the wheel at driver's side of the car - raise the jack just enough to start to push the wheel up a hair (see image).
|
Supporting the Wheel |
Step 4: Removing the Strut Tower Nuts
- Once you have support under the wheel you're working on, remove the 3 nuts on the top of that strut tower (see image).
- If your car has the OEM strut bar remove the 3 nuts on top of the strut bar bracket on that side of the car, then pull off the strut bar braket as well.
|
Strut Tower Nuts |
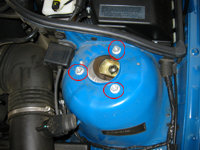
Step 5: Removing the Placement Pins
- While the strut tower tops are slotted to allow for the adjustment you are doing here, the factory places a "pin" to help keep the strut in the factory position. You will need to remove this pin to effect the desired change (see image)
- Apparently some pins have a 4mm Allen head while others have a star (torx) drive head. My car has the 4mm Allen version.
- Carefully unscrew the pin - these things are very soft aluminum and strip fairly easily (I stripped one of mine and had to remove it with a set of chanel locks - you can see the "damage" in the image).
|
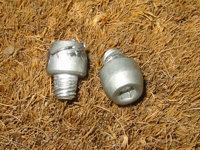
Factory "Pins"
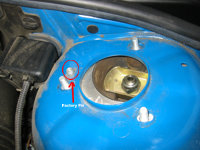
Pin in Place on Strut Tower Top
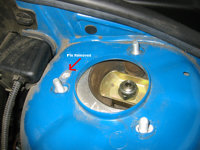
Strut Tower Top w/Pin Removed |
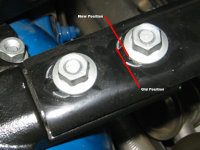
Step 6: Moving the Strut
- Lower the jack just enough to allow movement of the strut - but not enough for the tops of the strut bolts to fall in through the slots in the tops of the strut towers - do this in very small steps until you get the desired results,
- Once the struts are loose enough to move, push on the wheel to move the strut inward. You can also push on the bolts on top of the strut to do this.
- Once the strut top bolts are sitting against the inner edge of the strut tower slots gently jack the well back up to put pressure back on the underside of the strut tower tops and prevent movement.
|
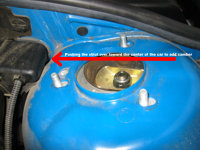
Moving the Strut |
Step 7: Tightening Things Back Down
- If you do not have an OEM strut bar, replace the 3 nuts at the top of the strut tower. Torque these to 18 ft lbs. Pop the plastic cover back on.
- If you have an OEM strut bar, replace the bracket and retaining nuts on the top of the strut tower. Torque to 18 ft lbs.
- In either scenario, make sure you have enough pressure on the wheel so that the strut does not move while you're tightening things down.
- Repeat for the other side.
|
|
Step 8: If You Have an OEM Strut Bar
- Lower the car back to the ground BEFORE reinstalling the traverse (center piece).
- Replace the traverse and tighten the 4 nuts down to 18 ft lbs.
- Note the amount of change you have made by examining the marks on the traverse from the original installation and after the camber change (see image).
|
Change as Seen on Strut Bar |

|