|
 |
This install takes 30 - 45 minutes and quite a bit of patience and care not to break things or scratch the car
Click on the images for larger views. |
Step 1: Getting the required items together
This install requires:
- Replacement headlight tirm (in this case OEM Titanium Trim)
- Long screwdriver (phillips or flat)
- A BMW M3 (E46).
- 30 - 45 minutes of free time.
|
 |
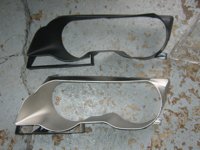
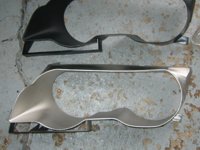
OEM Titanium & Black Trim Pieces
note that coupe and sedan trim are different |
Step 2: Releasing the light assembly
- You must first release and remove the Turn Signal Light assemblies on both sides of the car (highly recommend that you also remove the turn signal bulbs).
- For detailed instructions on how to do this see Steps 1 - 5 at the Front Turn Signal DIY.
|
|
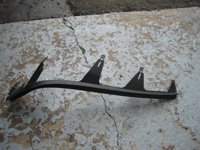
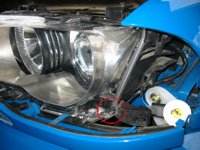
Step 3: Removing the lower headlight trim
- This step is straight forward if your car does not have headlight washers or a little tricky if you do.
- The trim is attached via 3 clips (see image)
- Pop the clips and carefully remove the trim piece.
- If you have headlight washers:
- You can remove the trim piece completely by disconnecting the washer line by pulling the washer unit forward out of the trim and (according to BMW) giving it a hard tug to release - this did not work for me.
- Alternatively, you can do the rest of the install without completely removing the trim piece. Just pull it forward and wedge it with a clean rag (make sure to use something under it or you will scratch the bumper). This is the route I took.
|
Headlight Trim Clips |
Step 4: Removing upper headlight trim
- The thin upper trim piece is attached with a series of clips at the back of the headlight housing
- Release the trim piece by starting at the fender side and working toward the center of the car (see images)
|
Trim In the Car
Trim Out Of the Car |
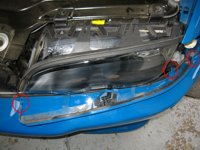
Step 5: Removing clear headlight lens cover
- 7 Large clips hold the lens cover in place.
- Work your way around the cover and release the clips (see image).
- Once released, pull the cover out of the car.
|
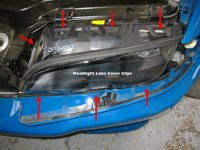
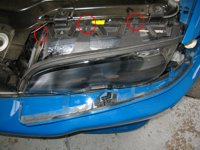
Lens Cover Clips
Lens Cover Out Of the Car |
Step 6: Removing the trim piece
- Grab the trim piece by the edges and give it a quick tug to release it from the headlight assembly.
|
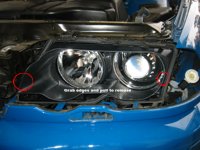
Exposed Trim |
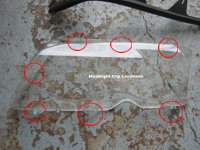
Step 7: Installing new trim
- Note the clip locations around the rear of the trim piece.
- Also note the rectangular open piece at the bottom inside side of the trim.
- Line up the clips with the openings in the headlight housing and make sure to line up the long tab at the bottom of the headlight housing with the rectangular opening at the bottom of the trim piece.
- Snap the trim in place and work your way around to make sure it is correctly and completely seated.
|
Trim Piece |
Step 8: Reinstalling the clear lens cover
- Note the location of a small plastic guide piece at the lower outside edge of the headlight housing (see image).
- Line up the lens cover with the clips and the guide piece and snap the lens cover back into place.
- Work your way around the lens cover to make sure its properly seated.
|
Lens Cover Guide |
Step 9: Reinstalling upper trim piece
- Align the upper trim piece clips with the attachment points on the headlight housing and snap the trim piece back into place.
|
|
Step 10: Reinstalling lower trim piece
- Align the lower trim piece clips with the attachment points below the headlight housing and at the front of the fender and snap the trim piece back into place.
|
|
Step 14: Replacing the turn signal assembly
|
|

|