|
 |
This install takes about 30 minutes. This is an easy install but you do need to pay attention since you're putting holes into parts of your $50K car.
Click on the images for larger views. |
Step 1: Getting the required items together
This install requires:
- OMP 1010 Pedal Set
- Electric Drill
- 1/8" and 15/64" drill bits
- 10mm Wrench
- 4mm Allen Wrench
- Masking (or similar) tape
- Vacuum Cleaner
- A BMW M3 (E46).
- 30 minutes of free time.
|
 |
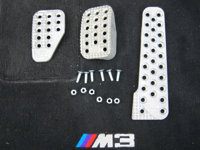
OMP Pedals and Mounting Hardware |
Step 2: Starting With the Gas Pedal
- Remove the floor mat.
- Line up the pedal cover on top of the stock plastic gas pedal.
- Though the following is not necessary it does make things easier. Use a piece of masking tape of the like to secure the pedal in place.
- If you do not like the location of the bolts on my gas pedal, pick your own. Just make sure that which ever holes you choose there is enough room behind the pedal that when its completely depressed the nut/bolt securing the pedal does not get in the way. Remember measure twice, drill once!
- Carefully drill through the first chosen hole in the gas pedal cover with the 15/64" bit.
|
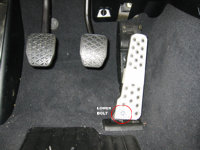
Lower Bolt in Place |
Step 3: Finishing the Gas Pedal
- Install the first bolt and snug it down by holding the nut with the 10mm wrench and tightening it down with the 4mm Allen wrench.
- Pick the second bolt's location (keeping in mind the issues raised in Step 1)
- Drill through the pedal cover for the second bolt.
- Insert the second bolt and tighten it down like the first.
- Test to make sure the gas pedal can go all the way down without interference from the bolts/nuts used to secure the pedal cover.
|
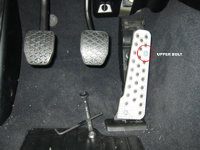
Upper Bolt in Place |
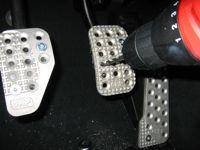
Step 4: On to the Clutch
- Start by pulling off the rubber OEM pad - just reach behind it and pull it off. Might as well pull the brake pedal pad off now too.
- The OMP pedal body is significantly larger than the stock clutch pedal. This gives you some room to decide how to mount it. Personally I have it set so that you can see the top of the clutch pedal half way through the top row of holes in the OMP pedal body.
- Note that there is a reason why the pedal is angled on the right - this is to allow for left foot braking.
- When installed mine lines up along side the angled portion of the stock pedal.
- Once you line it up in the position you like I would suggest taping it on like the gas pedal.
- Choose the holes you want to use and make sure there is a level surface on the reverse of the pedal for the nut.
- Once you're happy drill the first hole with the 15/64th bit.
- Install the first bolt and snug it up.
- Pick the location of the second hole and drill it.
- Insert the second bolt and tighten things up - you're done with the clutch.
|
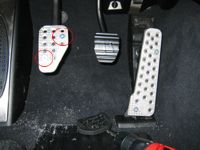
Clutch Pedal Installed |
Step 5: Brake Pedal - aka The Hard Part
- Unlike the gas and clutch pedals the brake pedal is steel. This obviously makes it a hell of a lot harder to drill.
- Again, line up the OMP pedal the way you want it to sit. Note that the car's brake pedal has ridges on the face.
- It is obviously FAR easier to drill if the hole you are trying to drill centers on the bottom of the ridge. So try to alight the OMP pedal in such a way that the bottoms of the ridges under both holes are centered.
- The best way to drill the steel pedal is to use the 15/64th bit to mark the car's pedal through the OMP pedal body. Just mark it enough to make a divot in the steel.
- Remove the OMP pedal.
- Swap out to a significantly smaller bit (I used a 1/8th) and drill through the pedal.
- Once you have the smaller hole drilled go back with the 15/64th bit and open the hole up to the required diameter.
- Put the pedal body back on and snug the bolt.
- Follow the same procedure for the second hole. After you've marked the hole's location take the pedal body off and drill the rest of the way. This way you will not bugger up the new pedal body.
- Insert both bolts and tighten things up - you're done! Vacuum the floor and you're all set.
|
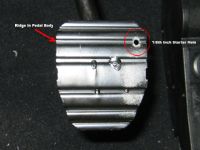
Brake Pedal With Starter Hole
Marking the Second Hole
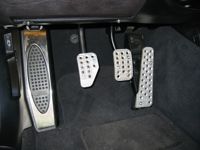
Pedals Installed |

|